Product Overview
Smart Export for SSMS is a productivity suite for Microsoft SQL Server. Tagline: Beautiful Excel exports from SSMS in one click.
SQLToExcel includes three complementary tools that share the same installer and license:
| Module | Purpose |
|---|---|
| Smart Export | Write or paste SQL, preview results, and export to Excel, CSV, HTML, or images — with style templates, column mapping, data masking, and more. |
| Smart Update | Run SELECT queries and edit results in an Excel-like grid — then write INSERT, UPDATE, and DELETE back to the database. |
| Smart Bulk SQL | Queue .sql script files and batch execute them against a connection — with concurrent runs, scheduling, and execution history. |
Smart Export — common use cases
- Daily report exports
- Sending formatted Excel files to business stakeholders
- Post-query workflows — copy as SQL, send email, generate scripts
- Import existing Excel, CSV, or HTML files and re-export without a database connection
Smart Update — common use cases
- Quick data fixes without writing manual UPDATE statements
- Bulk-inserting rows from a query result
- Reviewing and editing lookup tables inline
- Generating WHERE / IN / MERGE scripts from selected rows
Smart Bulk SQL — common use cases
- Running migration or seed scripts across many .sql files
- Deploying schema changes to staging before production
- Scheduled off-peak batch execution
- Reviewing which scripts succeeded or failed with per-file error details
Supported environments
- SSMS extension — SSMS 18 and later (installer requires SSMS 18 minimum)
- Windows desktop edition — standalone app with manual connection strings; Smart Update has its own tab
System Requirements
- Windows 10 or Windows 11 (64-bit)
- SQL Server Management Studio 18 or later
- .NET Framework 4.7.2 or later
Installation
SSMS extension
- 1
Run the installer
Download SQLToExcelSetup.exe and run it with administrator privileges.
- 2
Restart SSMS
Close and reopen SQL Server Management Studio after installation.
- 3
Open from the menu
Smart Export appears under Extensions: Smart Export..., Activate License..., and About.... Smart Update appears under Tools: Smart Update.... Smart Bulk SQL appears under Tools: Smart Bulk SQL....
| Menu item | Function |
|---|---|
| Extensions → Smart Export... | Open the export work window |
| Tools → Smart Update... | Open the inline editing window |
| Tools → Smart Bulk SQL... | Open the batch SQL script runner |
| Extensions → Activate License... | Activate your license key |
| Extensions → About... | Version and product information |
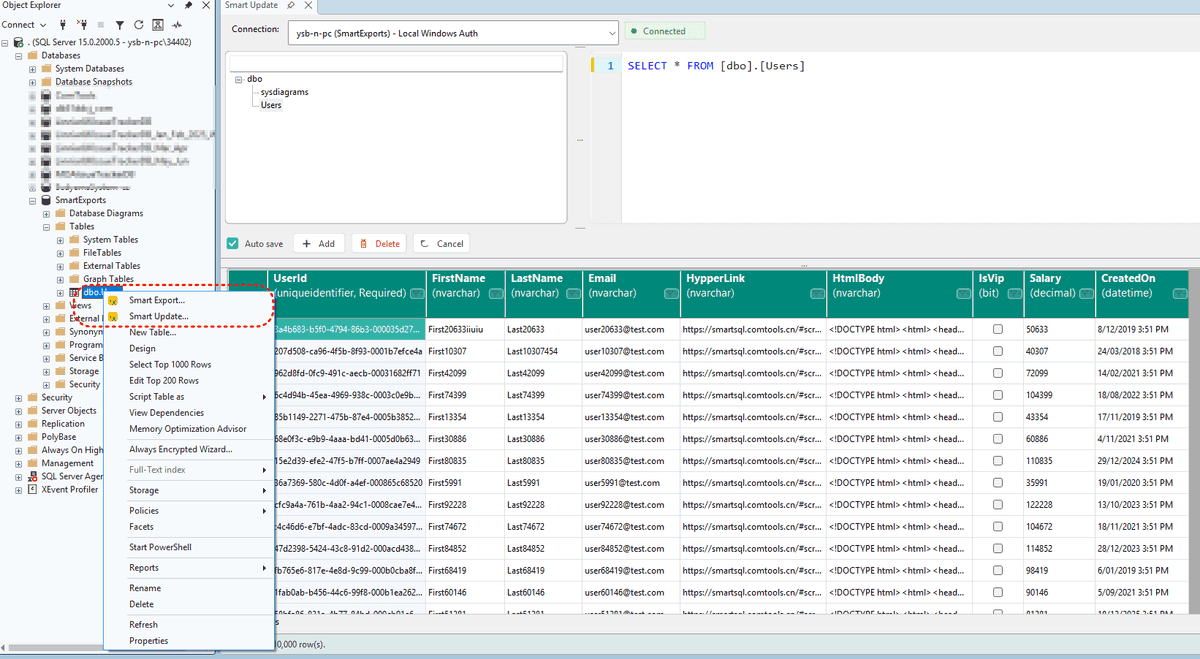
Object Explorer shortcut
Right-click any table in Object Explorer and choose Smart Update... to open Smart Update with a SELECT statement pre-filled, the connection selected, and the query executed automatically.
Quick Start — Smart Export
- 1
Write SQL in a query window
Compose or select the SQL statement you want to export.
- 2
Open Smart Export
Choose Smart Export → Smart Export... from the SSMS menu.
- 3
SQL auto-fills
The tool reads the current query editor text automatically.
- 4
Execute
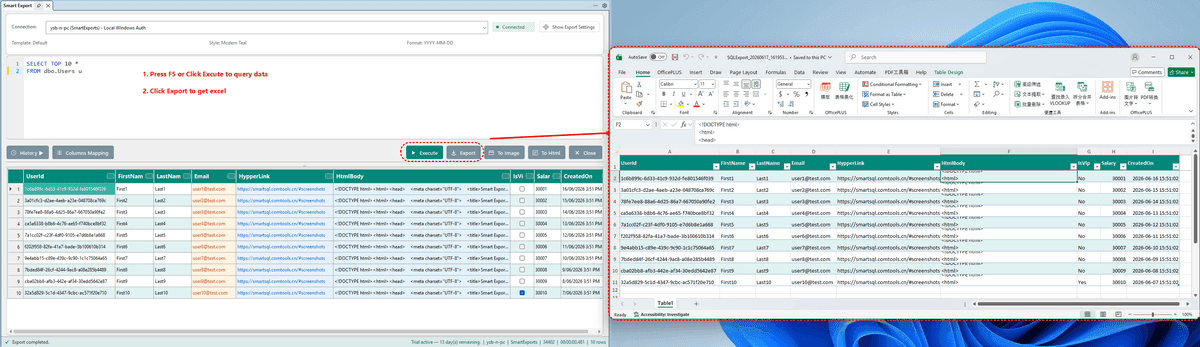
Select a database connection and click Execute (or press F5).
- 5
Export
Preview results, then click Export to save as Excel or another format.
Smart Update Overview
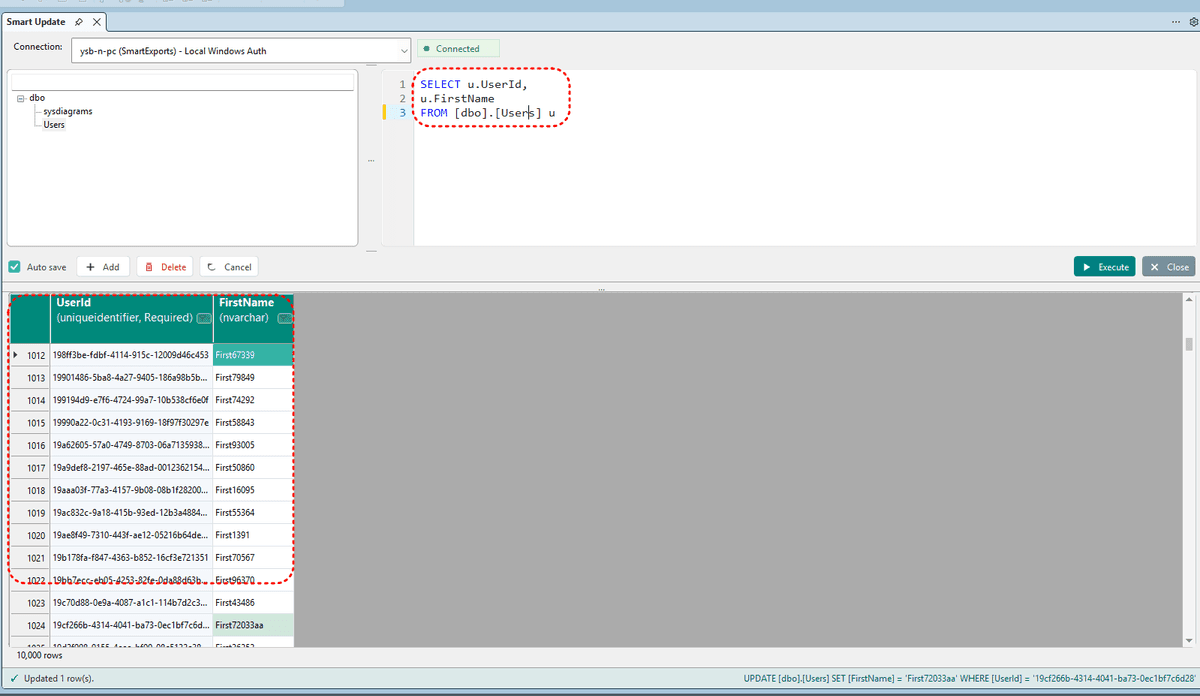
Smart Update is the visual query + grid editing + write-back module in SQLToExcel. It is built around the SmartUpdateControl component and lets you edit query results like a spreadsheet, then persist changes to SQL Server.
How to open Smart Update
| Entry point | Behavior |
|---|---|
| Tools → Smart Update... | Opens the Smart Update tool window |
| Object Explorer → right-click table → Smart Update... | Auto-fills SELECT, selects the connection, and executes the query |
| From a query editor (via menu) | Attempts to read the current query window SQL and fill the editor |
| SQLToExcel Desktop → Smart Update tab | Same control as the SSMS extension |
Connection & query
- Select a database connection from the dropdown — a status badge shows connected / disconnected
- Left panel: Schema browser — double-click a table to generate SQL and execute
- Right panel: SQL editor with syntax highlighting
- Only SELECT statements are supported — press F5 or click Execute
- Editable mode loads up to 10,000 rows; larger result sets are truncated with a warning
Smart Update vs Smart Export
| Smart Export | Smart Update | |
|---|---|---|
| Primary goal | Export results to files | Edit data in the database |
| Output | Excel, CSV, HTML, image | INSERT / UPDATE / DELETE |
| Grid | Preview for export | Editable with write-back |
| Row limit (typical) | Up to 500,000 preview rows | 10,000 editable rows |
Quick start
- 1
Open Smart Update
Tools → Smart Update... or right-click a table in Object Explorer.
- 2
Select connection & run SQL
Choose a connection, write or accept the SELECT, and press F5.
- 3
Edit the grid
Change cells, add rows, or delete rows when editing is enabled.
- 4
Save changes
Use Auto save (save on row leave) or click Save for manual batch commit.
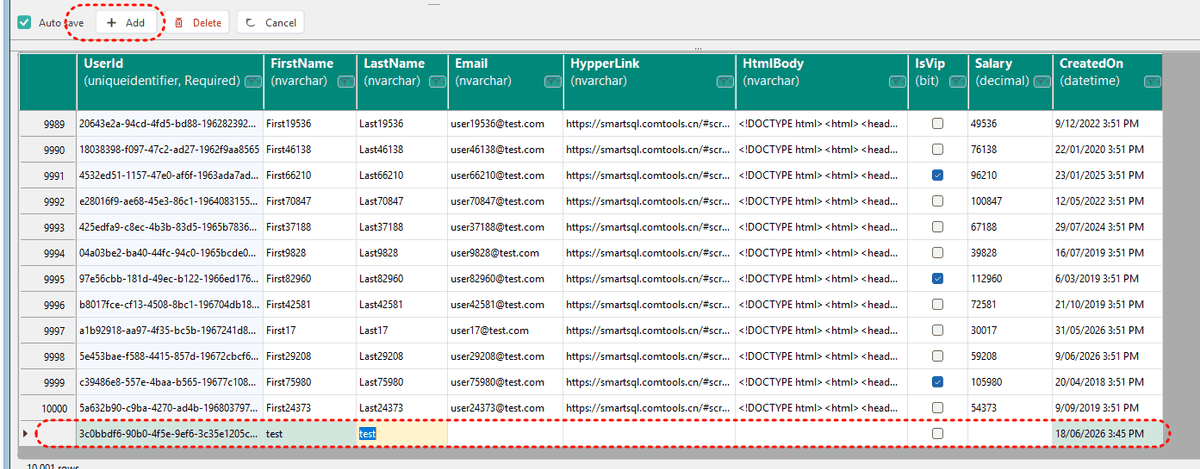
Grid Editing
When all editable conditions are met, the result grid supports full CRUD write-back. Without a valid license, the grid is read-only.
| Action | How it works |
|---|---|
| Modify row | Edit a cell → row marked Modified → UPDATE on save |
| Add row | Click Add → fill new row → INSERT on save |
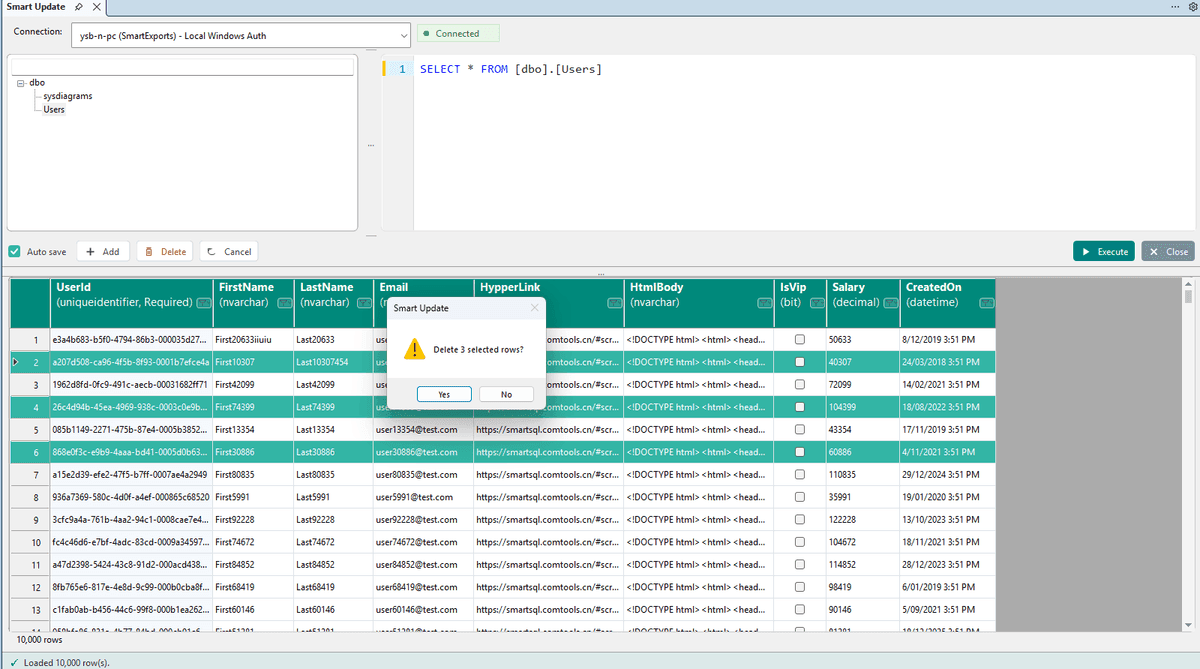
| Delete row | Select row(s) → Delete → DELETE on save |
| Auto save | Changes save when you leave the row |
| Manual save | Edit multiple rows, then click Save to batch-commit |
| Cancel | Auto save: undo current row; Manual: discard all unsaved changes |
| Esc | Cancel editing the current cell |
Editable conditions
- Valid license activated (unlicensed = view only)
- Query resolves to a single updatable table
- Views are read-only
- Primary key columns must appear in the result set
- Result set has 10,000 rows or fewer
Visual feedback
| State | Color |
|---|---|
| New row | Green |
| Modified, unsaved | Yellow |
| Saved | Dark green |
Column protection rules
| Column type | Behavior |
|---|---|
| Identity / computed columns | Read-only — gray background |
| JOIN columns from non-target table | Read-only |
| Primary key / WHERE columns | Light background; may be frozen |
| Required columns | Red highlight when empty; validated before save |
Data validation
- Input validated against column type and schema (length, nullability, etc.)
- Required fields checked before save
- UPDATE or DELETE affecting multiple rows triggers a warning
- UPDATE affecting 0 rows rolls back that row's changes
- Refreshing the query with unsaved changes prompts for confirmation
- Auto save preference is persisted in user settings
The status bar at the bottom shows success, warning, and error messages plus the last executed SQL script. A loading indicator appears during query execution.
Grid Operations
| Operation | Description |
|---|---|
| Sort | Click a column header to sort |
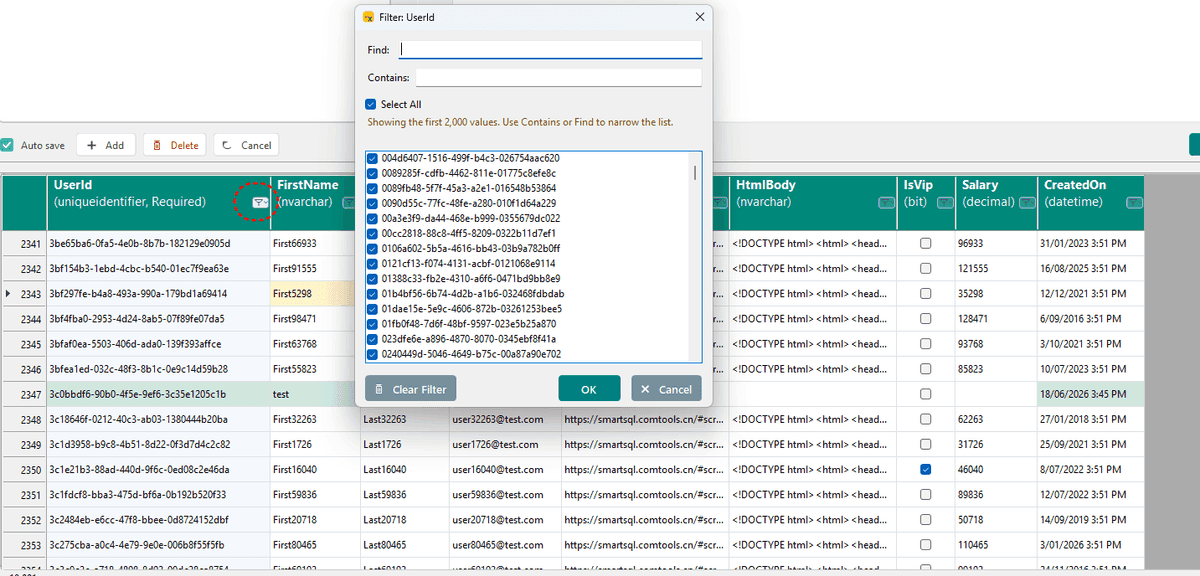
| Column filter | Open the filter dialog from the column header; Clear filters removes all |
| Copy / Paste | Cell-level copy and paste |
| Undo | Revert a cell to its original value |
| Multi-select rows | Click row headers to select multiple rows for batch delete |
| Column width | Double-click the column divider to auto-fit |
Scripts & Context Menu
Basic operations
- Copy
- Paste
- Delete
- Undo
- Save
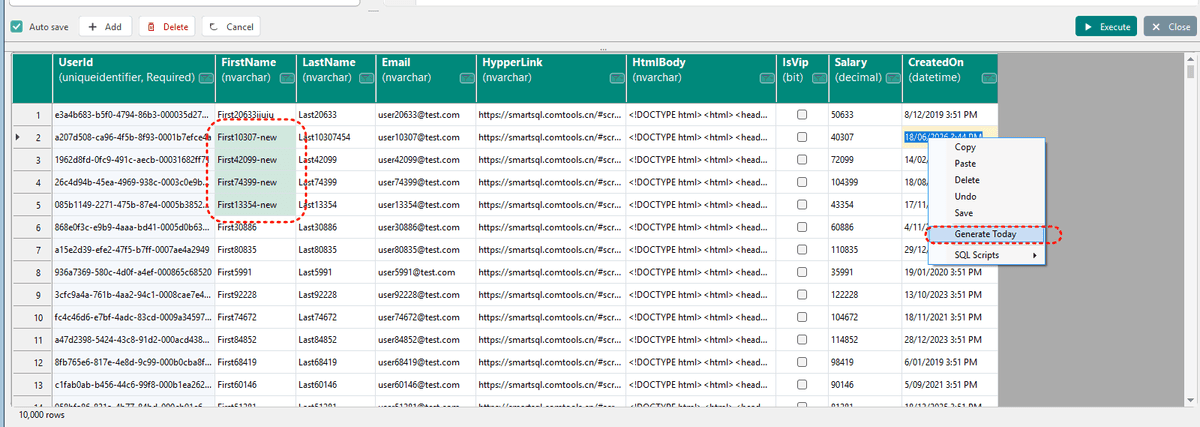
Generate values
- Generate GUID
- Generate Today (current date)
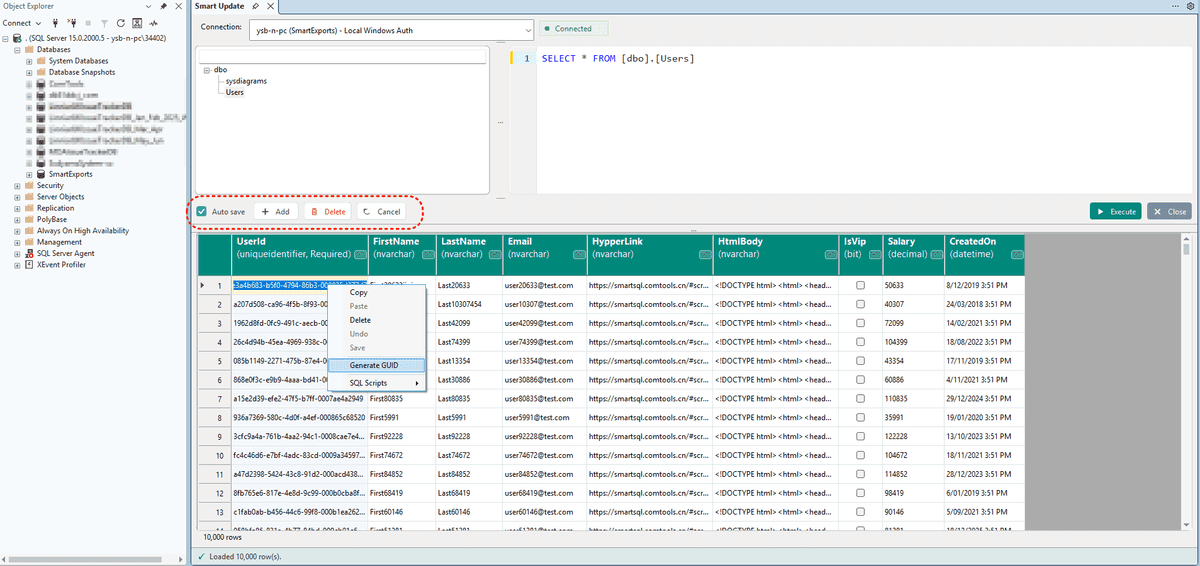
SQL Scripts submenu
- Generate WHERE
- Copy as IN / NOT IN / VALUES
- Script INSERT, UPDATE, DELETE, MERGE
Generated SQL is copied to the clipboard. The status bar shows the last executed script.
Smart Bulk SQL Overview
Smart Bulk SQL batch executes multiple .sql script files against a SQL Server connection. Queue files or folders, run them sequentially or concurrently, schedule one-time jobs, and review execution history — without opening each script manually in SSMS.
How to open Smart Bulk SQL
| Entry point | Behavior |
|---|---|
| Tools → Smart Bulk SQL... | Opens the batch execution window |
Smart Bulk SQL vs other modules
| Smart Export | Smart Update | Smart Bulk SQL | |
|---|---|---|---|
| Primary use | Export query results | Edit query results | Run .sql script files |
| Input | SQL in editor | SELECT query | Files on disk |
| Output | Excel, HTML, CSV, image | Database writes | Execution log & history |
Batch Execution
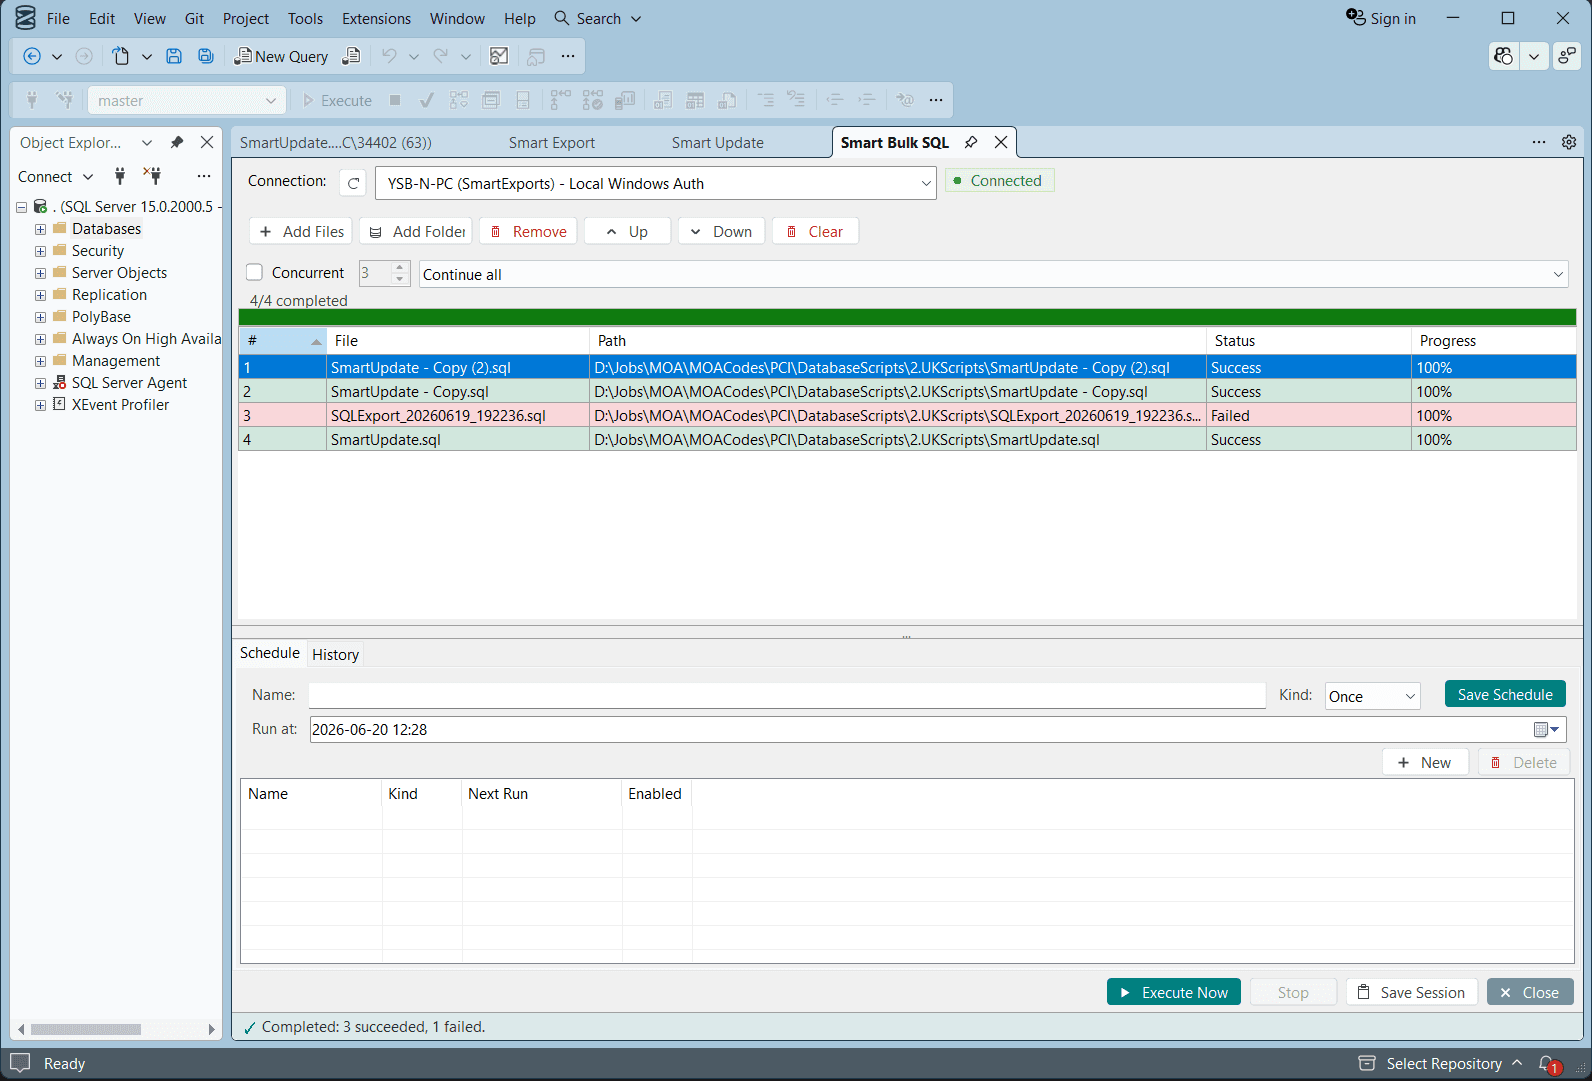
Building a queue
- Add Files — select one or more .sql files
- Add Folder — import every .sql file from a directory
- Remove — delete selected files from the queue
- Up / Down — reorder execution sequence
- Clear — remove all files from the queue
Execution settings
| Setting | Description |
|---|---|
| Connection | Target SQL Server connection — must be connected before Execute |
| Concurrent | When enabled, runs multiple scripts in parallel (configurable count) |
| Error policy | Continue all — keep running remaining scripts if one fails |
Running and monitoring
- Execute Now — start batch execution immediately
- Stop — halt the current run
- Save Session — persist the file queue and settings for later
- Per-file Status column shows Success or Failed with progress percentage
- Summary bar reports total succeeded and failed counts
Schedule & history
Switch to the Schedule tab to create a one-time scheduled run with a name, date, and time. Use Save Schedule to persist it.
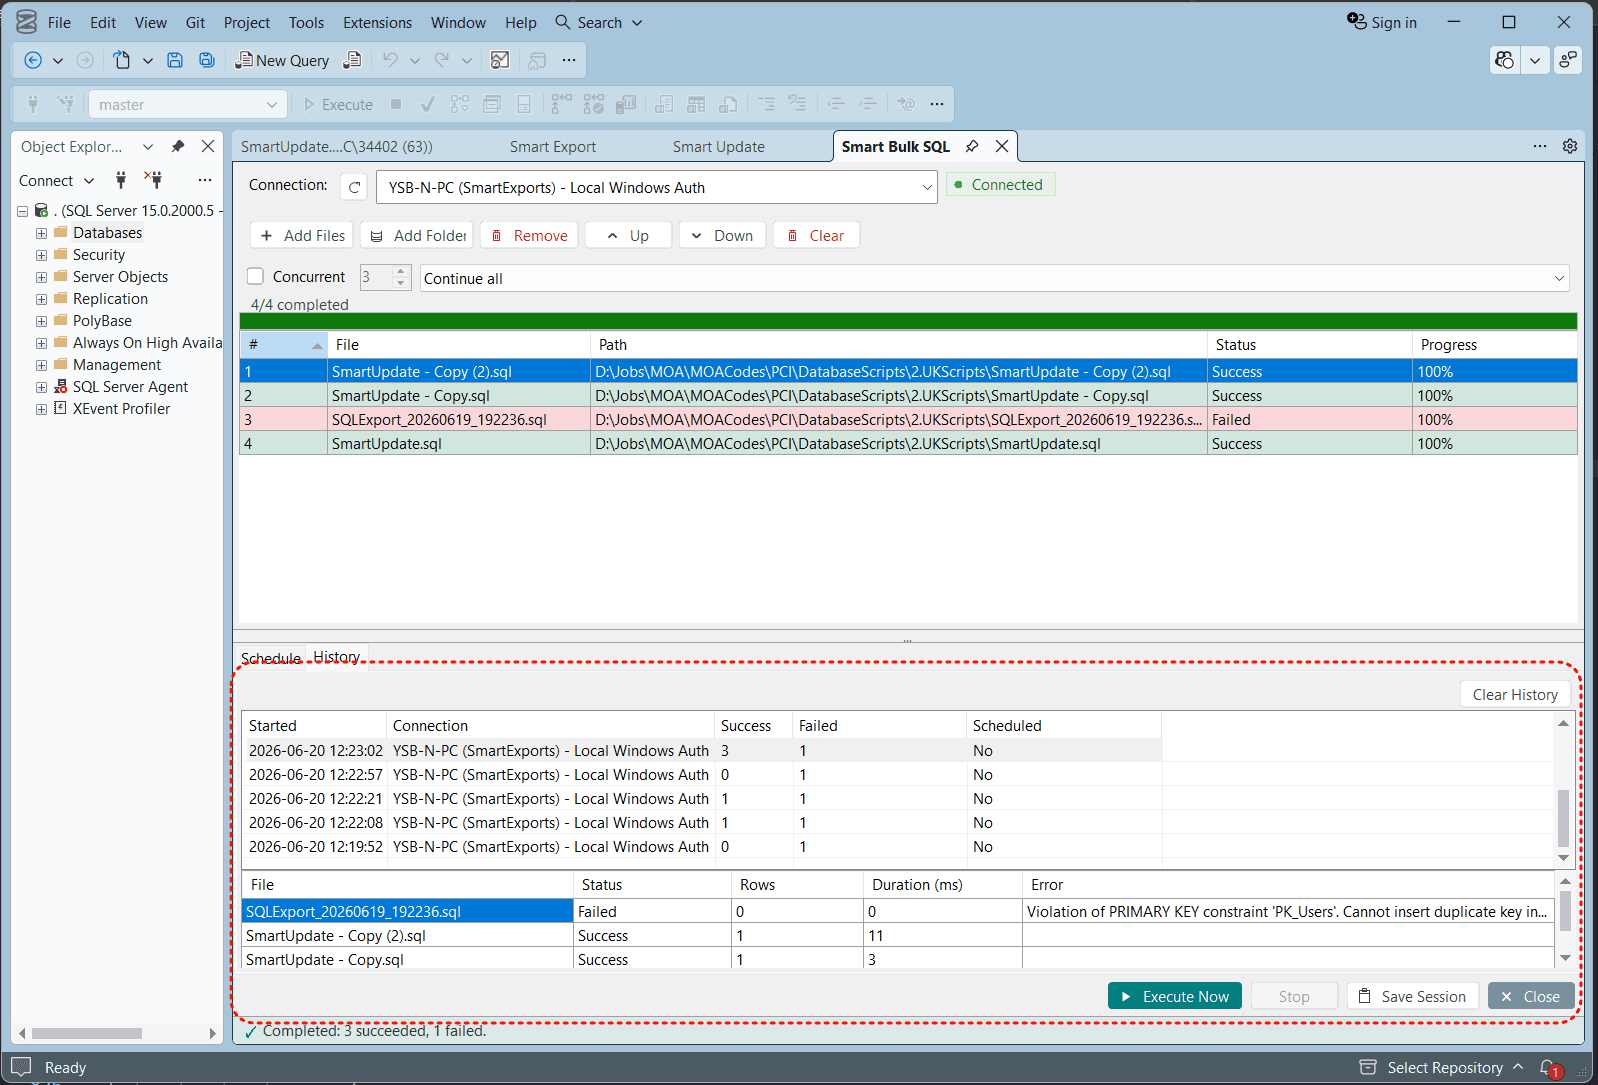
History details
- Top grid — past sessions with start time, connection, success/failed counts
- Bottom grid — per-file results for the selected session: rows affected, duration, errors
- Failed scripts show the SQL Server error message (e.g. constraint violations)
Export Interface Layout

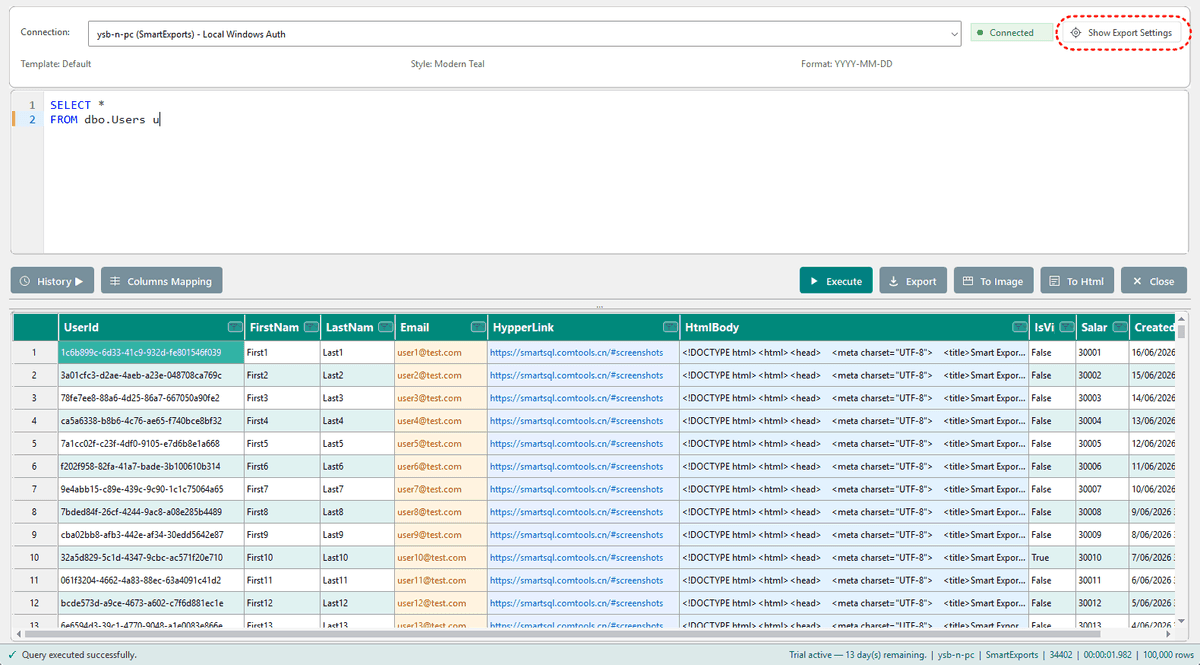
Database Connections
SSMS mode
- Lists database connections already open in SSMS
- Reuses the connection from the current query window
- Shows a connection status badge (connected / disconnected)
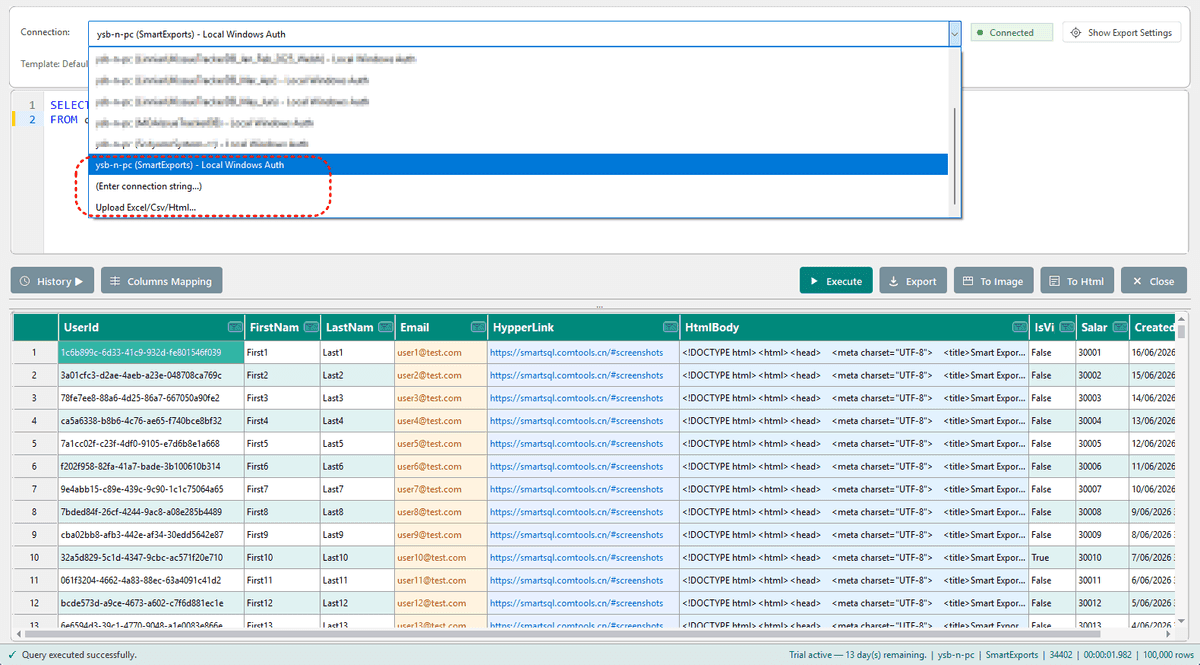
Desktop mode
- Save and manage multiple connections
- Choose Enter connection string... to type a connection string manually
- Local servers default to Windows authentication; remote servers can use SQL Server authentication
File upload mode
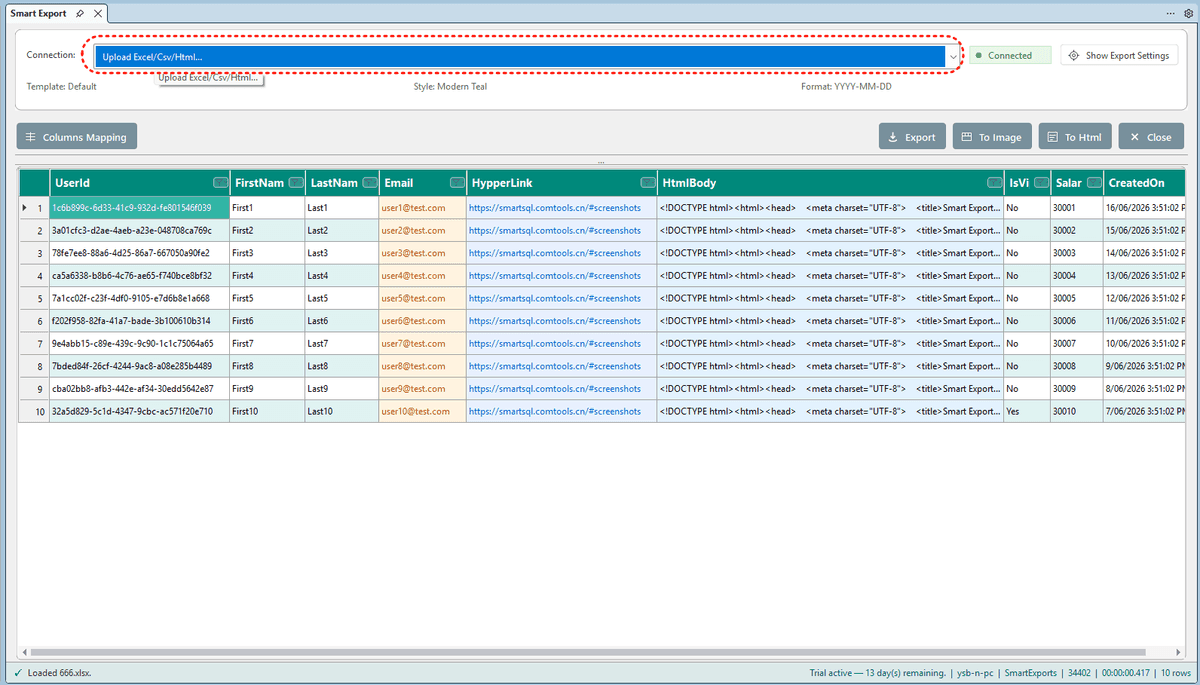
- Select Upload Excel/Csv/Html... from the connection dropdown
- Load local files into the preview grid without a database
- Export directly after import — Execute is disabled in file mode
SQL Editor
| Feature | Description |
|---|---|
| Syntax highlighting | SQL keywords, strings, and expressions are color-coded |
| Line numbers | Line number gutter on the left |
| IntelliSense | Keywords, tables, columns, and expressions (requires active connection) |
| Format SQL | Right-click → Format SQL; formats selection if text is selected |
| F5 shortcut | Execute the query |
| Auto-fill | Opens with SQL from the SSMS query window when launched from SSMS |
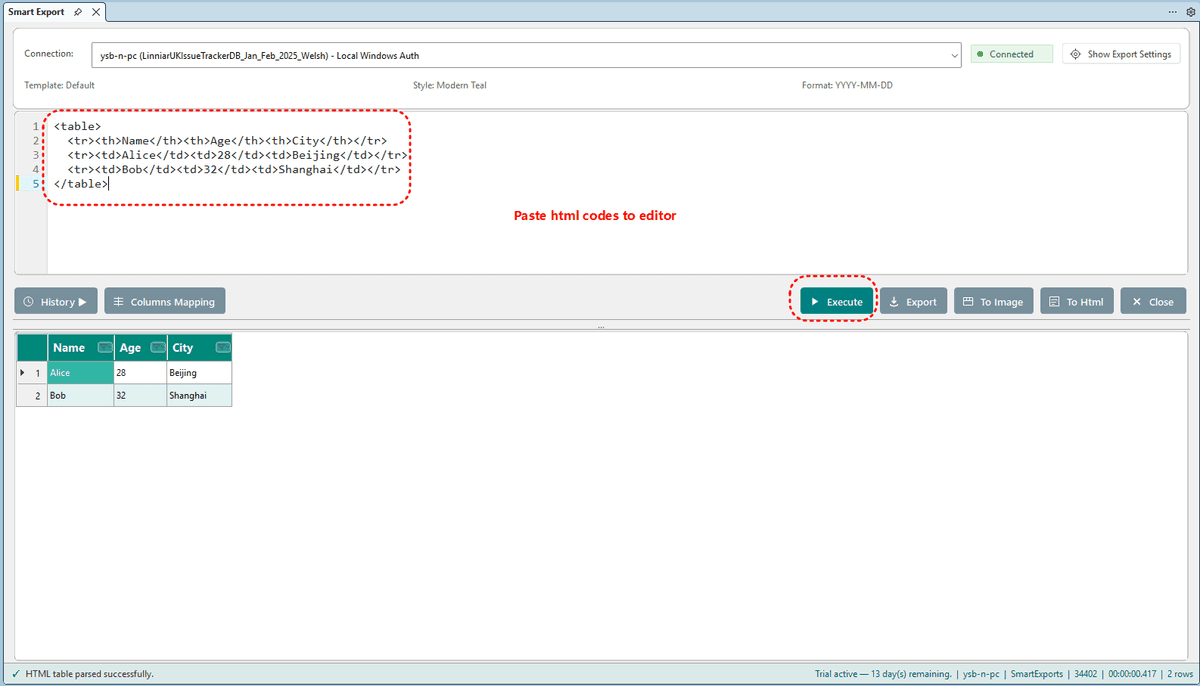
| HTML table paste | Paste an HTML table and Execute to parse it as data |
Execute & Preview
- Click Execute to run SQL and load results into the preview grid
- Preview supports up to 500,000 rows (warning shown if exceeded)
- After column filters, up to 100,000 matching rows are shown
- Large result sets load incrementally with a loading indicator
- Non-SELECT statements show a confirmation prompt before running
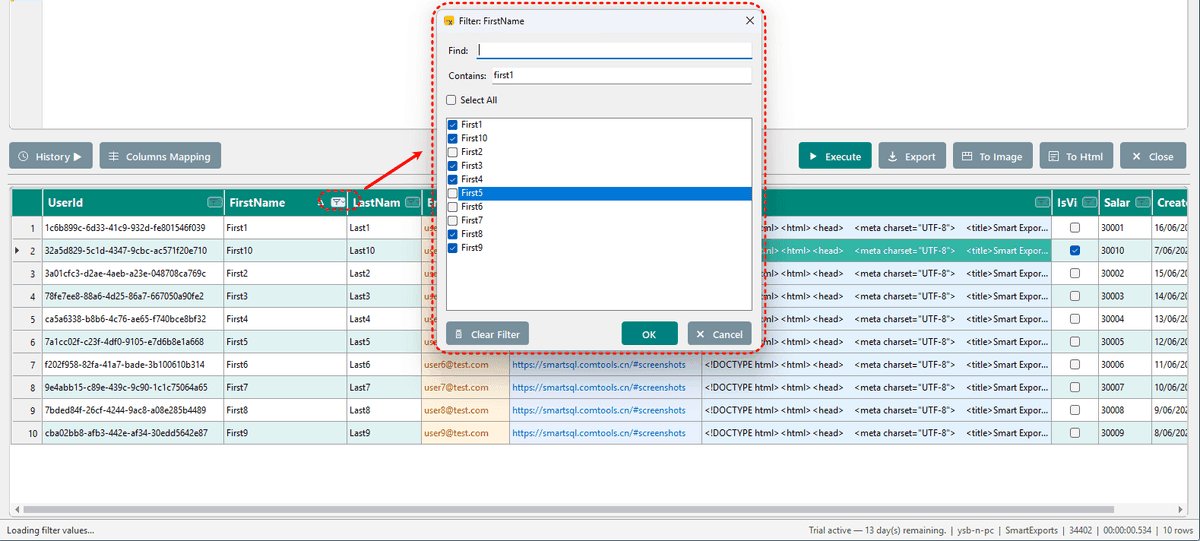
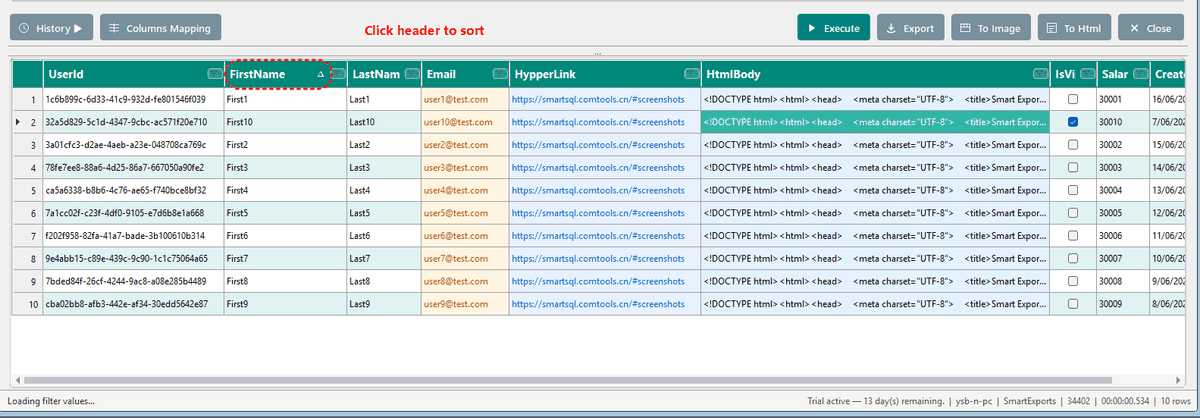
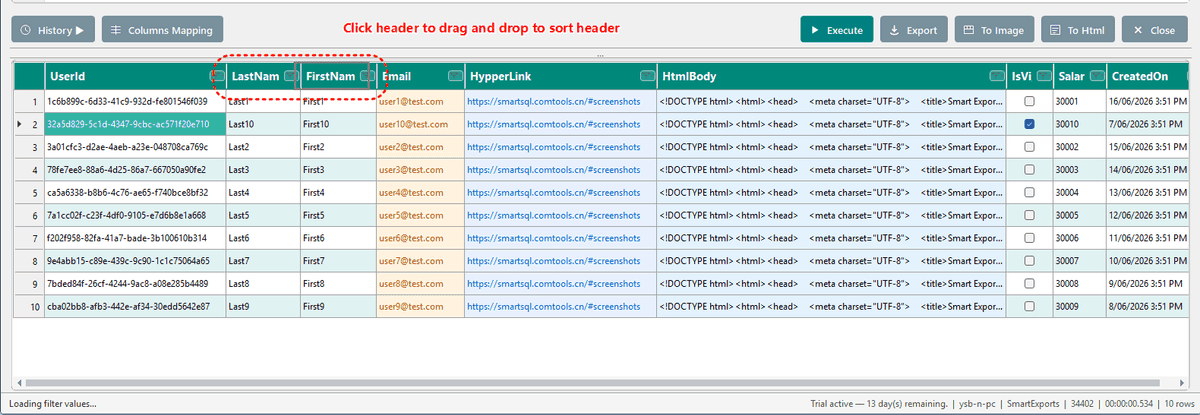
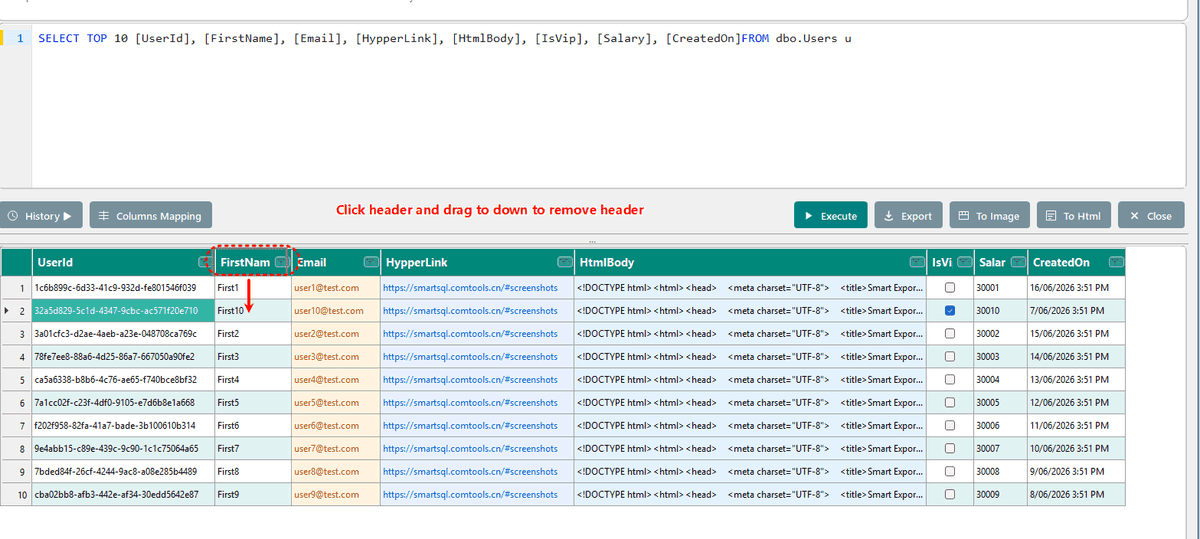
- Column header filters, drag-to-reorder columns, and drag-down on a header to remove a column from export
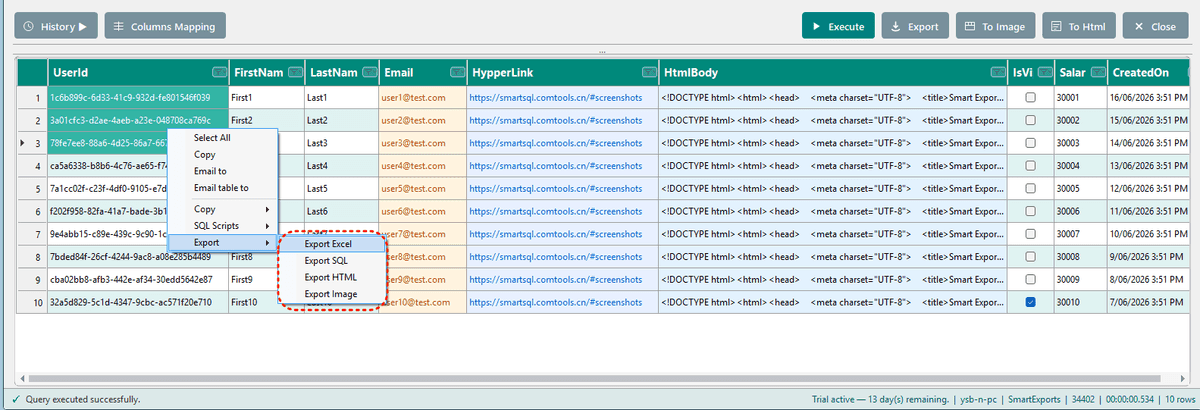
Export Formats
| Button / Menu | Format | Notes |
|---|---|---|
| Export | Excel (.xlsx) | Primary output with full styling support |
| Right-click → Export CSV | CSV | UTF-8 with BOM |
| To Html | HTML | Styled table output |
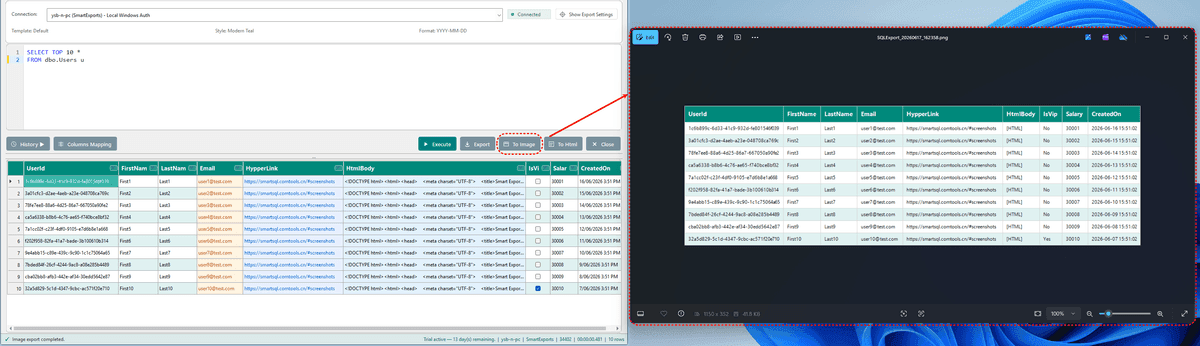
| To Image | Image | Table screenshot export |
Current export settings and style template are applied before every export.

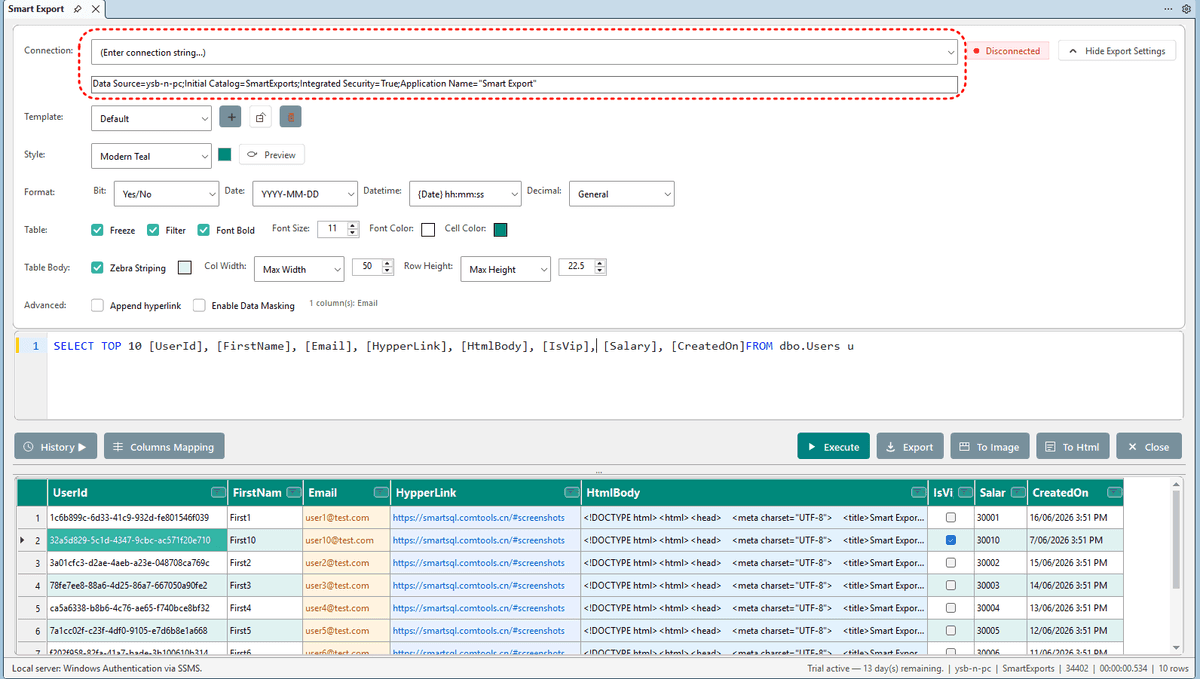
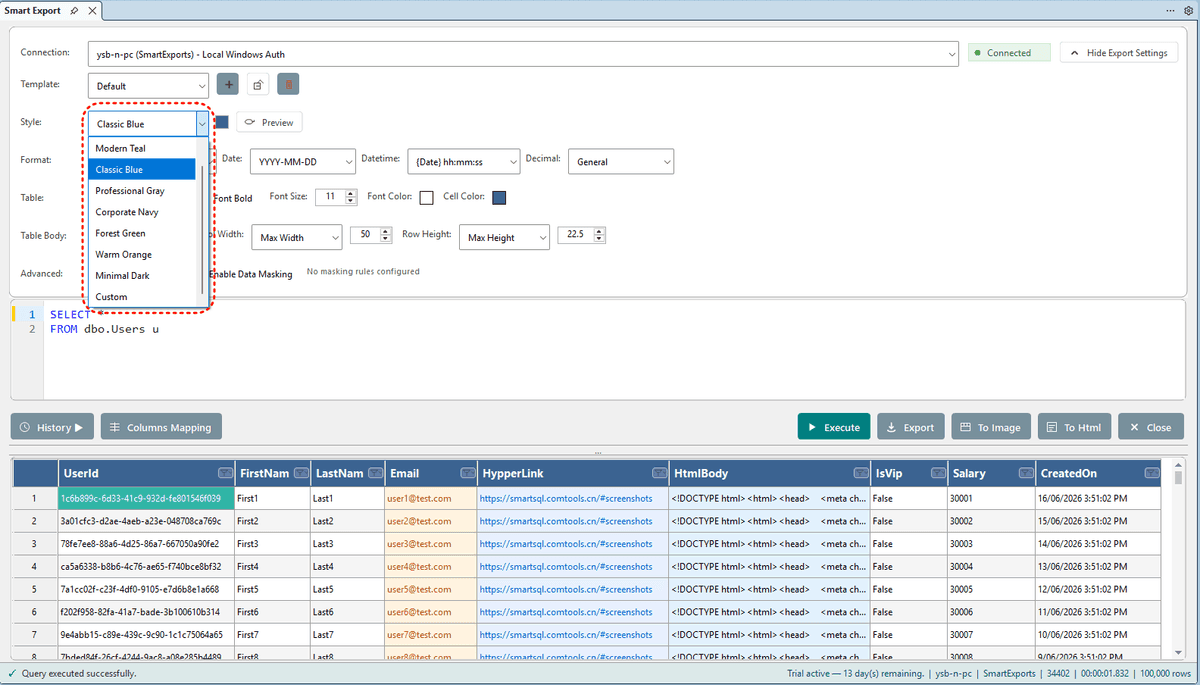
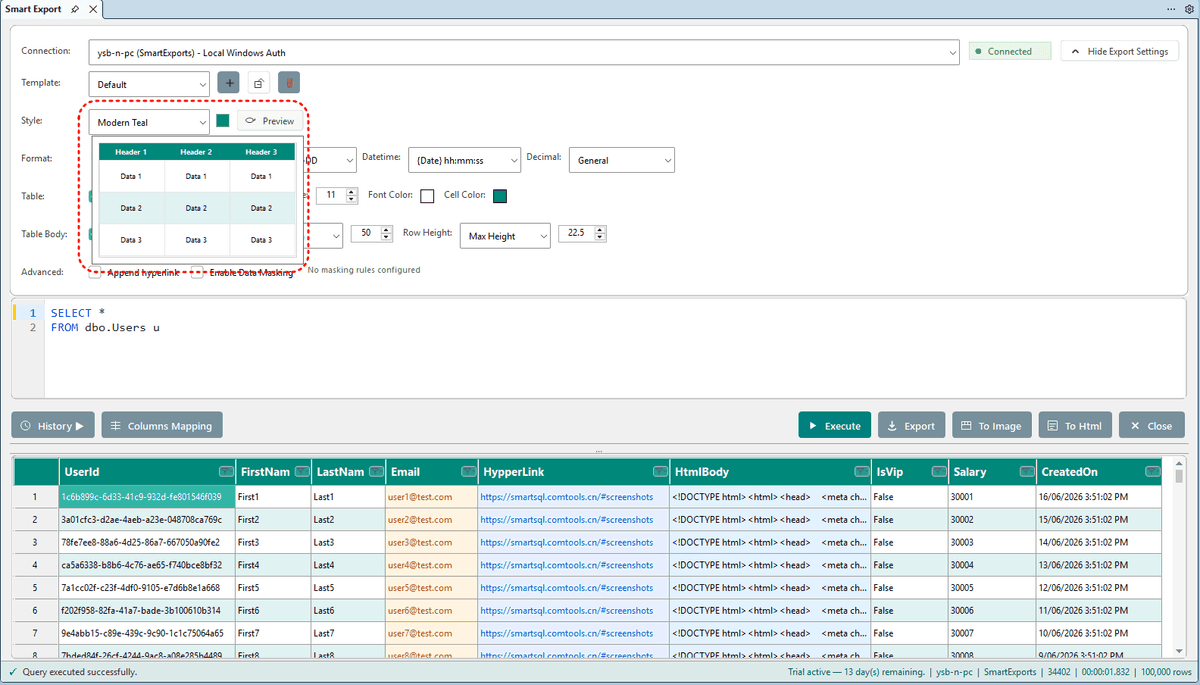
Style Presets
Seven built-in presets plus None and Custom:
- Modern Teal (default)
- Classic Blue
- Professional Gray
- Corporate Navy
- Forest Green
- Warm Orange
- Minimal Dark
- None — plain data, no styling
- Custom — automatically selected after manual changes
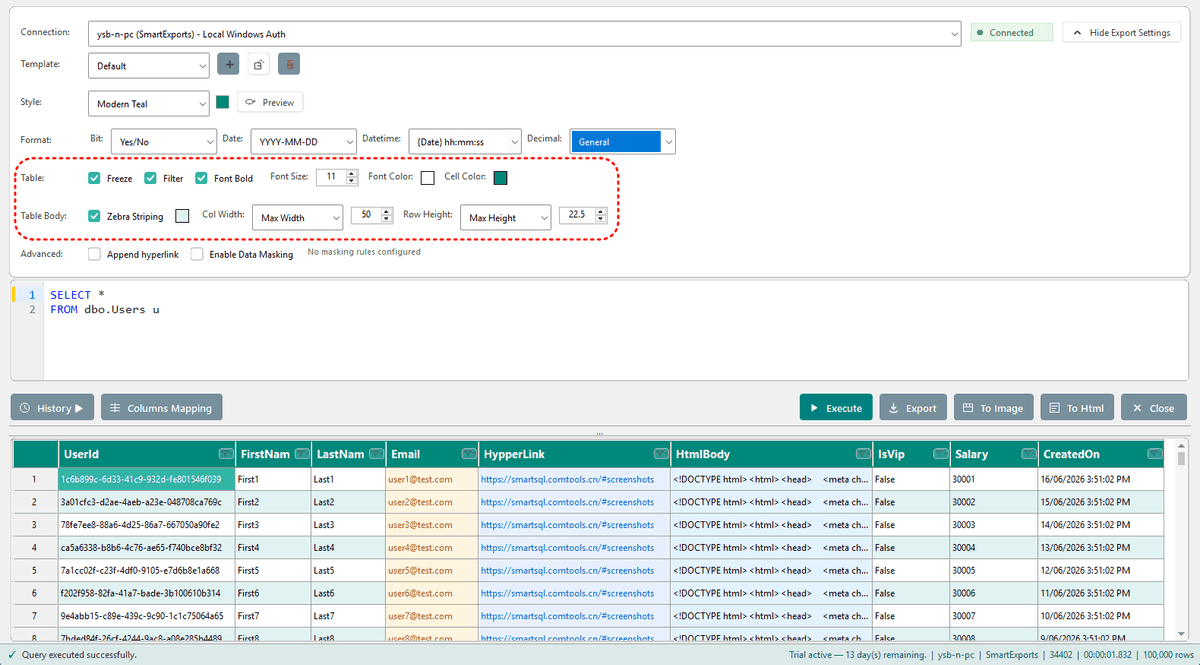
Customizable options
- Header font size, color, background, bold
- Zebra striping and alternating row colors
- Freeze header row
- Excel header filter
- Column width: AutoFit / MaxWidth
- Row height: AutoFit / MaxHeight
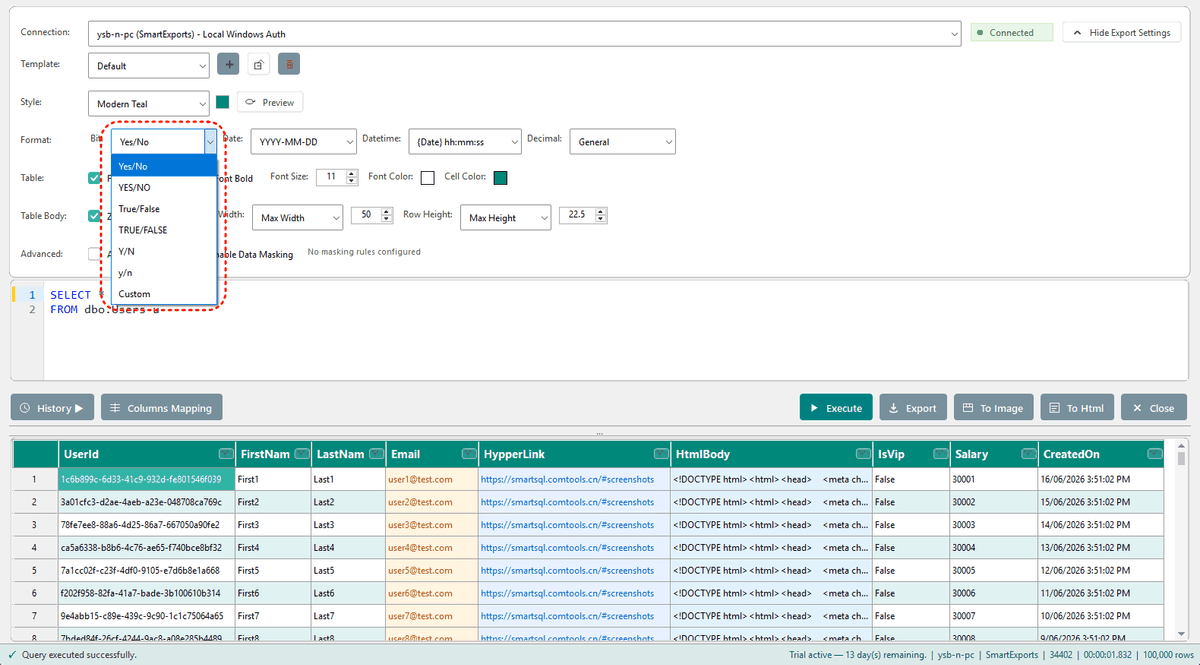
Data Formatting
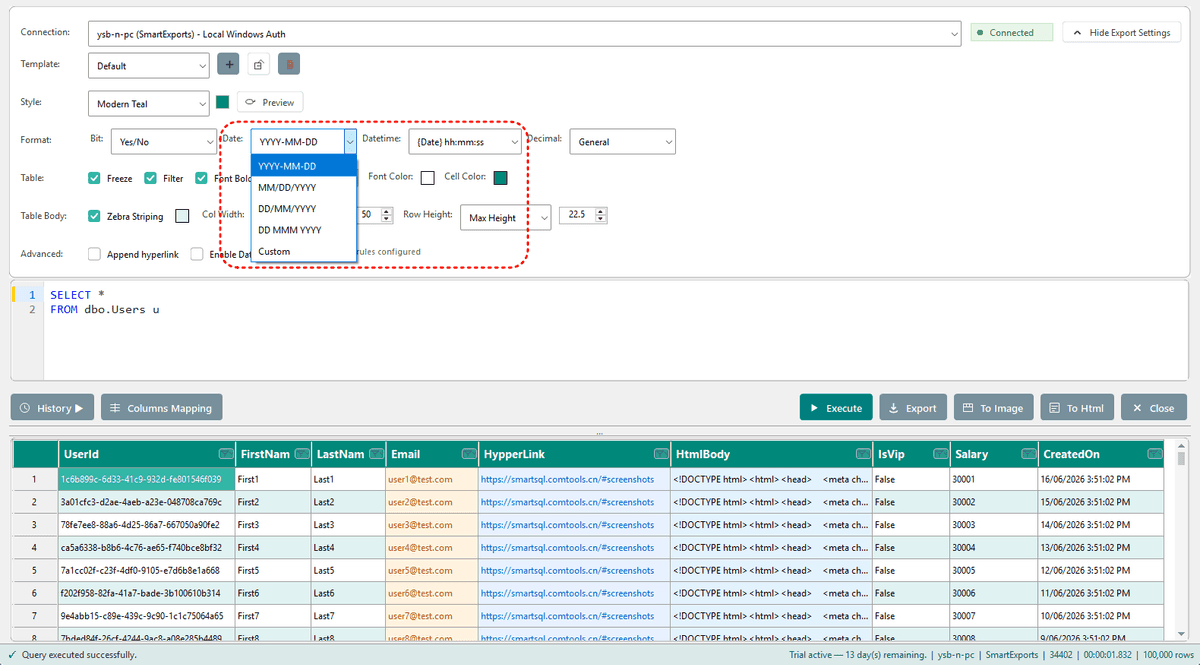
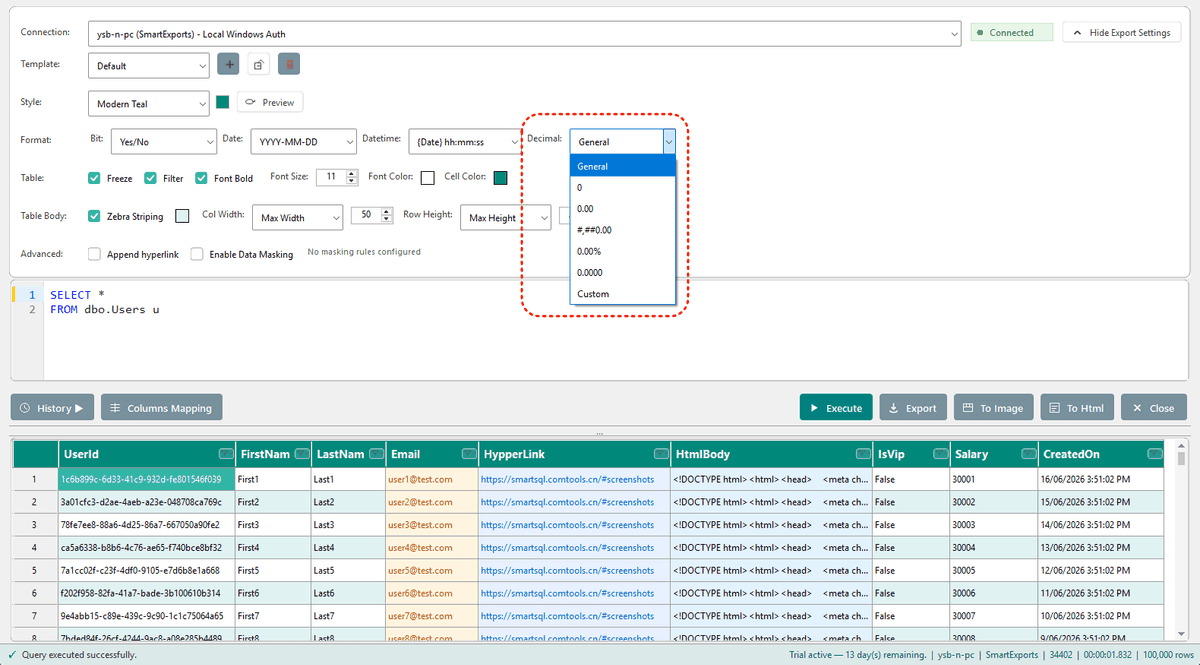
Column types are formatted consistently on export:
| Type | Format options |
|---|---|
| Bit (boolean) | True/False, YES/NO, Y/N, or custom |
| Date | yyyy-MM-dd, MM/dd/yyyy, dd/MM/yyyy, and more |
| DateTime | Date + time, 12-hour, date-only, and more |
| Decimal | General, integer, two decimals, thousands separator, percentage, and more |
All types support a Custom Excel format string.
Export Templates
- Built-in Default template — cannot be deleted
- Save As... saves all current export settings (style, formats, masking rules, etc.)
- Option to include the SQL statement in the saved template
- Rename or delete user-created templates
- Remembers the last used template automatically
- Ideal for recurring reports — configure once, reuse every time
Column Mapping
- Map query result column names to export and script column names
- Spaces are removed from column names by default
- Mapped names are used for INSERT, UPDATE, DELETE, and MERGE script generation
- Mapping rules can be saved in export templates
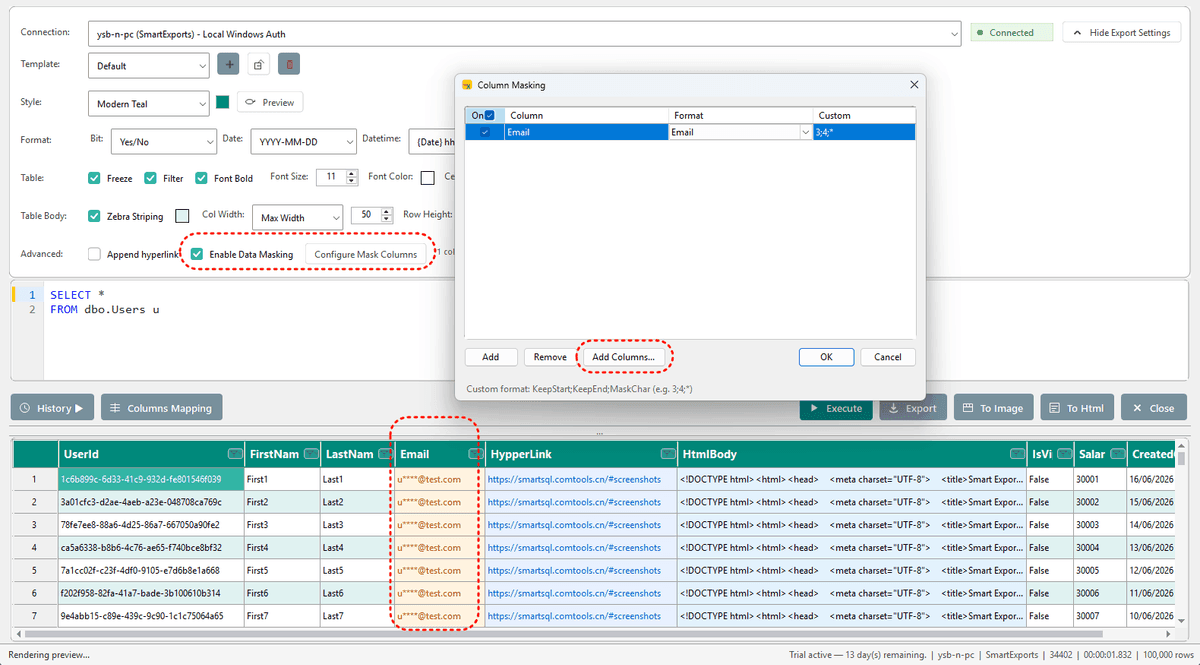
Data Masking
- Toggle Enable Data Masking to apply rules on preview and export
- Configure masking per column
- Built-in formats: Keep First/Last, Full, Phone, IdCard, Email, Name
- Custom rules supported (e.g. 3;4;* meaning keep 3 chars, mask 4, show rest)
- Preview grid shows masked values in real time
File Import
Supported formats: .xlsx, .xlsm, .csv, .html, .htm
How to import
- Select Upload Excel/Csv/Html... from the connection dropdown, or
- Paste an HTML table into the SQL editor and click Execute
Append hyperlink — when importing Excel or HTML, optionally preserve or append hyperlink columns.
After import, the tool enters file mode: Execute is disabled; use Export directly.
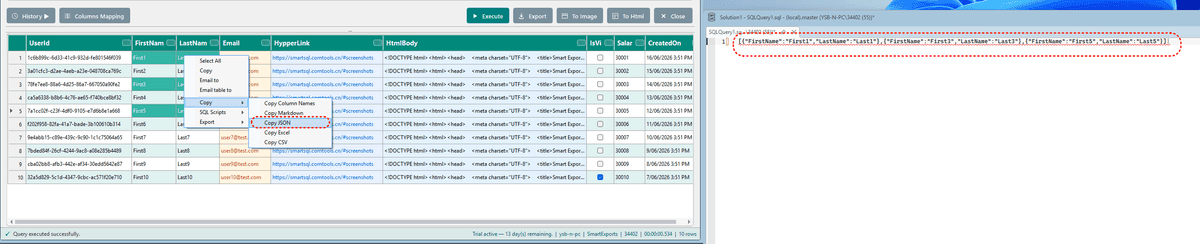
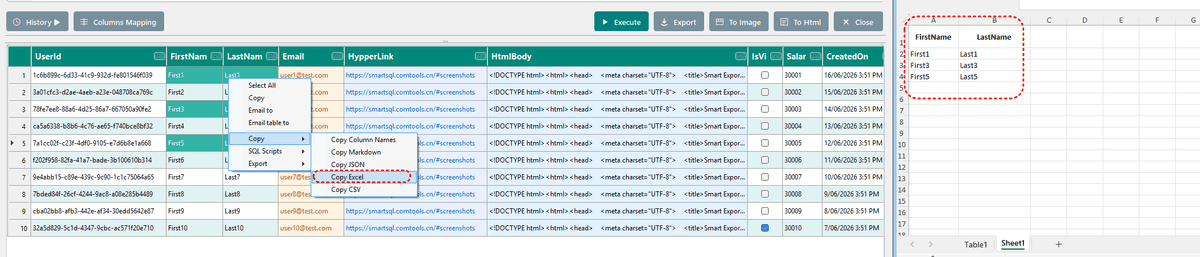
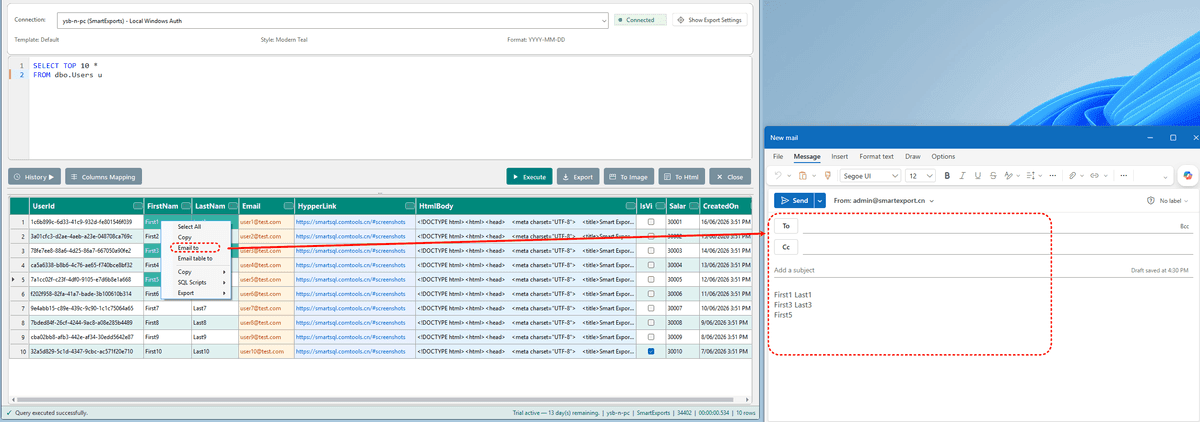
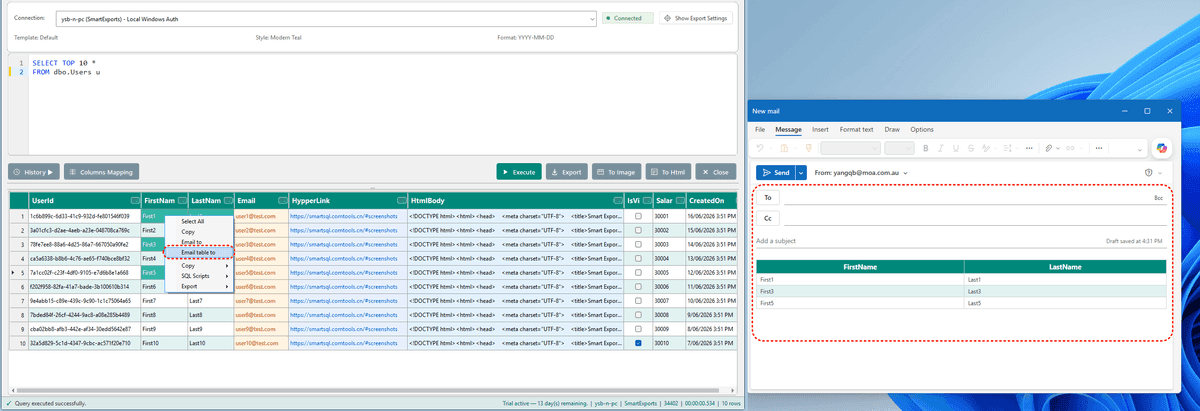
Export Context Menu
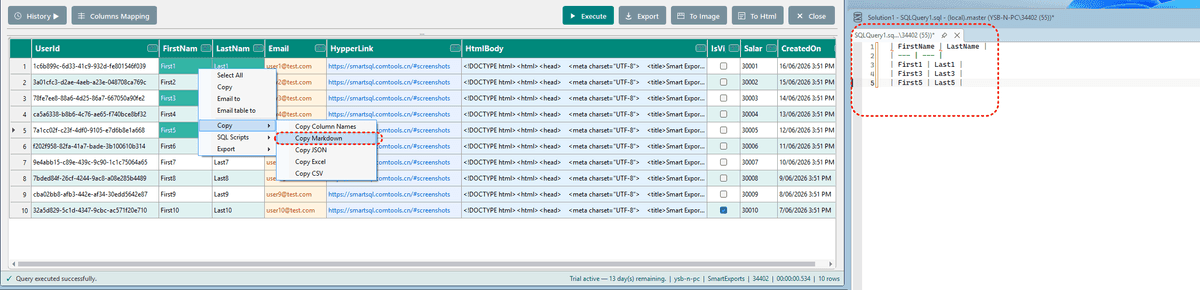
Select & copy
- Select All, Copy cell, Copy Column Names
- Copy as Markdown, JSON, Excel, or CSV
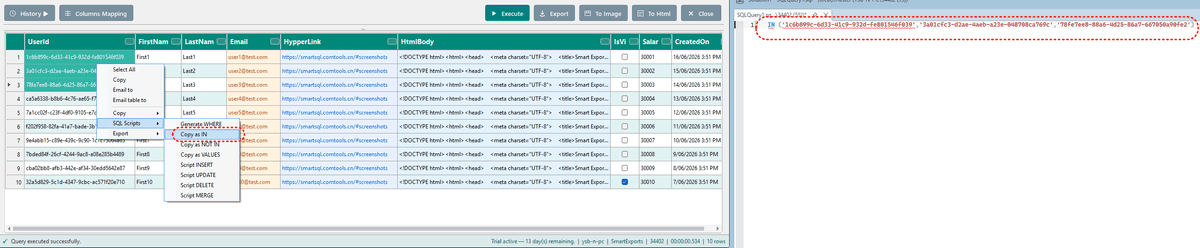

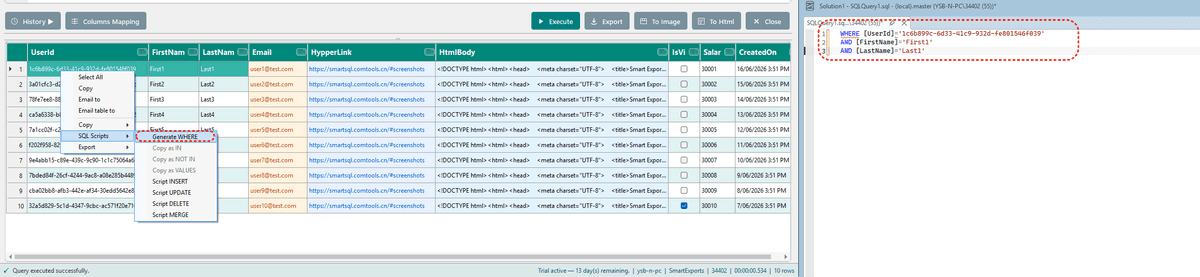
SQL scripts
- Generate WHERE
- Copy as IN / NOT IN / VALUES
- Script INSERT, UPDATE, DELETE, MERGE
Export & email
- Export Excel, CSV, HTML, or Image for selected cells only
- Email to — send selected content
- Email table to — send the full table as HTML email
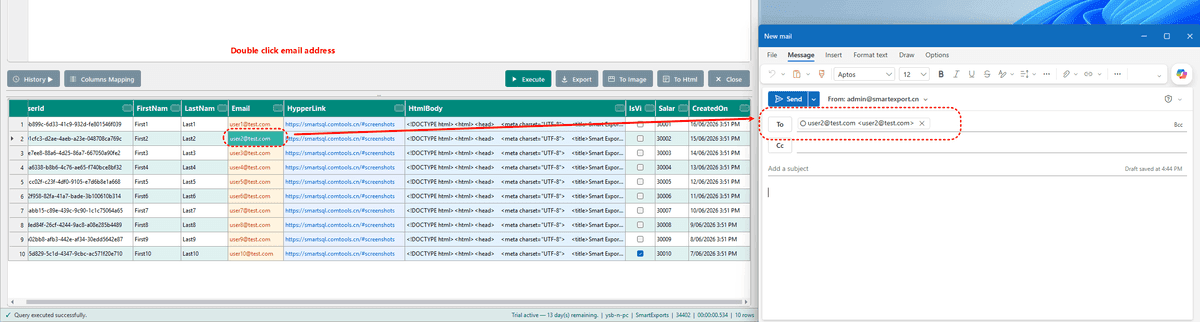
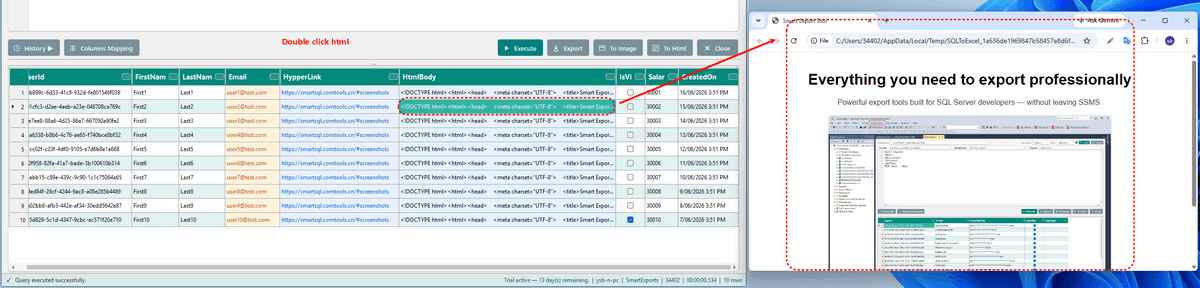
Hyperlinks & email shortcuts
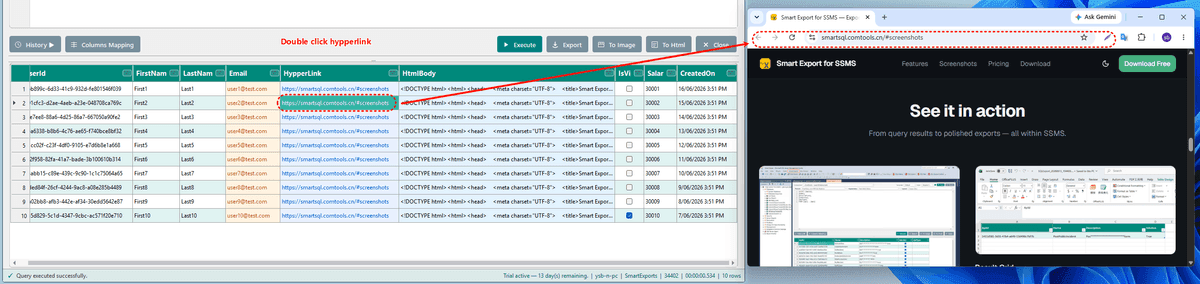
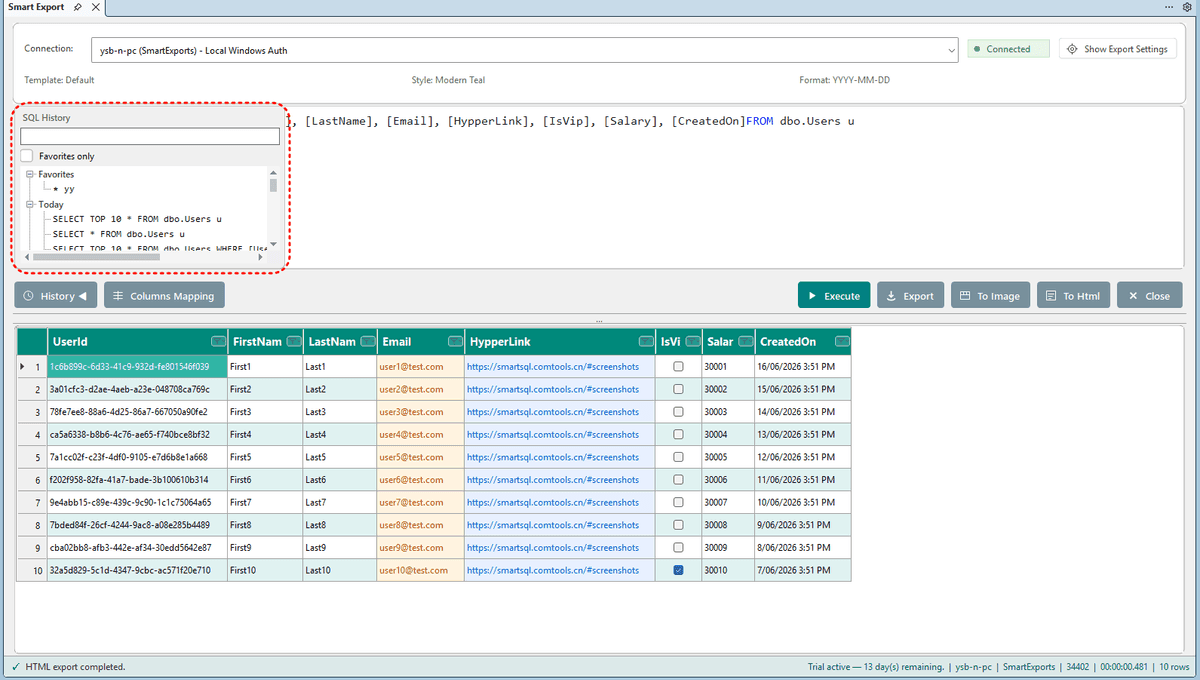
SQL History
- Automatically records executed SQL (up to 300 entries)
- Search and filter by favorites
- Right-click: Run Again, Load to Editor, favorite/unfavorite, delete
- Double-click an entry to load it quickly
- Stored in your user profile — survives reinstall if files are preserved
- Email to — sends selected cell content
- Email table to — sends the full result table as an HTML email body
- Opens a .eml draft or uses Outlook if already running
Licensing
| Item | Details |
|---|---|
| Trial | 15-day full-feature trial |
| Paid license | Annual license (365 days) or Lifetime |
| Activation | Menu → Activate License... — enter transaction ID and key (SE-XXXX-XXXX-XXXX-XXXX-XXXX) |
| Machine binding | License is bound to the current computer |
| Trial expired | Smart Export: read-only preview, export disabled. Smart Update: view only, editing disabled |
| Offline grace | Up to 30 days offline; online validation recommended every 7 days |
See pricing for plan details.
Data & Config Storage
Settings are stored in your user AppData folder under SQLToExcel:
| File | Contents |
|---|---|
| sql-history.xml | SQL execution history |
| export-templates.xml | Saved export templates |
| export-style.xml | Style settings |
| license.state | License status |
| desktop-connections.xml | Desktop edition connections (desktop only) |
The installer can preserve these files on uninstall/reinstall.
Desktop Edition
The standalone Smart Export desktop app provides the same main interface as the SSMS extension. Smart Update is available as a separate tab with the same SmartUpdateControl. The menu includes Activate License and About. Connection management and manual connection strings are available in desktop mode.
FAQ
Smart Export window fails to open?
Restart SSMS and try again.
Connection list is empty?
Connect to a database in SSMS first. In desktop mode, add a connection or enter a connection string manually.
Export button is grayed out or asks for activation?
Your trial has ended. Activate a license to continue exporting.
Large queries are slow?
Preview is capped at 500,000 rows. Export reads the full result set — add WHERE clauses or export in batches.
How is this different from SSMS Save Results As?
Smart Export adds style templates, masking, column mapping, multi-format export, SQL script tools, history, and email — all in one integrated workflow.
Why can't I edit rows in Smart Update?
Check that your license is active, the query targets a single updatable table (not a view), primary keys are in the result set, and the row count is 10,000 or fewer.
Can I use JOINs in Smart Update?
You can SELECT with JOINs for viewing, but only columns from the target updatable table are editable. Columns from joined tables are read-only.
What happens if UPDATE affects zero rows?
Smart Update rolls back that row's modifications and shows a warning in the status bar — typically caused by another session changing the row first.
Support
Questions or issues? Email 344028991@qq.com.
New to Smart Export? Download the installer to get started.